Create a Digital Terrain Model
Overview
SCRIMMAGE is capable of displaying a digital terrain model as a stage for simulation. In order to do this, we create terrain data that covers the area of interest. This terrain data consists of an elevation file, which defines the shape of the terrain, and an image file, which provides the terrain’s visual texture (grass, trees, roads, etc.)
This tutorial explains how to create terrain data for an arbitrary area of interest. Although the instructions in this tutorial use the McMillan Airfield at Camp Roberts in California as a reference example, the procedure can be generalized to any area of interest. In addition, these procedures demonstrate how to create the digital terrain model with free, readily available software and source data.
Prerequisites
This tutorial relies on two geographic information system (GIS) software packages: QGIS and GRASS GIS. These software packages are free and support all major operating systems. The QGIS software, as well as installation instructions, can be found at https://qgis.org/en/site/forusers/alldownloads.html. GRASS GIS can be found at https://grass.osgeo.org. For this tutorial, QGIS 2.18.17 and GRASS GIS 7.4.0 were used on Ubuntu 18.04.
Data Source
The terrain in SCRIMMAGE is constructed from elevation data and aerial imagery. The United States Geological Survery (USGS) provides these data sets through The National Map Data Download and Visualization Services. Its best elevation data is 1/3 arc-second Digital Elevation Model (DEM) data. 1/3 arc-second roughly corresponds to 10 meters, so each pixel in the DEM raster represents an approximate 10m-by-10m square of terrain. Its best aerial imagery comes from the National Agriculture Imagery Program (NAIP). It is “four band” (red, green, blue, infrared) imagery with a resolution of 1 meter, so each pixel represents a 1m-by-1m square area.
SCRIMMAGE can also display extrusions of ground-based objects such as buildings. These extrusions are constructed from polygons in a GeoJSON file that have a height property. Many cities provide GeoJSON files with building footprints, but these files might not have building heights. In this tutorial, we create a GeoJSON file that has a height property. Although not used in this tutorial, Microsoft provides building footprint data through the Microsoft Building Footprint Data wiki.
Instructions
Step 1: Setup the folder structure
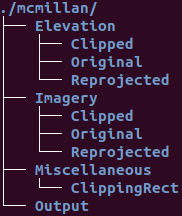
Before starting the QGIS program, generate a folder structure to hold a QGIS project and its data. GIS operations are data-intensive and can generate a large number of files, so it helps to keep your data organized. The directory structure used in this tutorial is shown below. The “Original” folders will contain the source data, and the “Clipped” and “Reprojected” folders will contain data that will be generated from the source data. We will save the final versions of our data to the “Output” folder.
Step 2: Obtain The National Map (TNM) Data
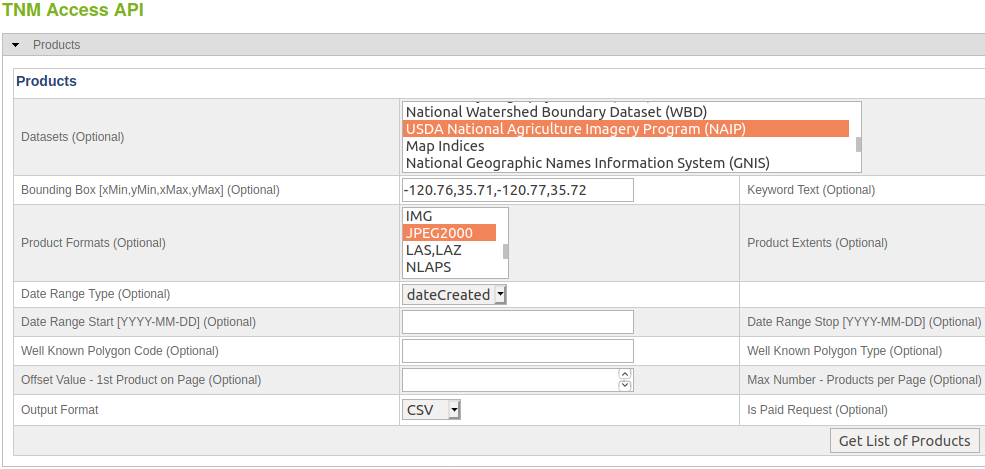
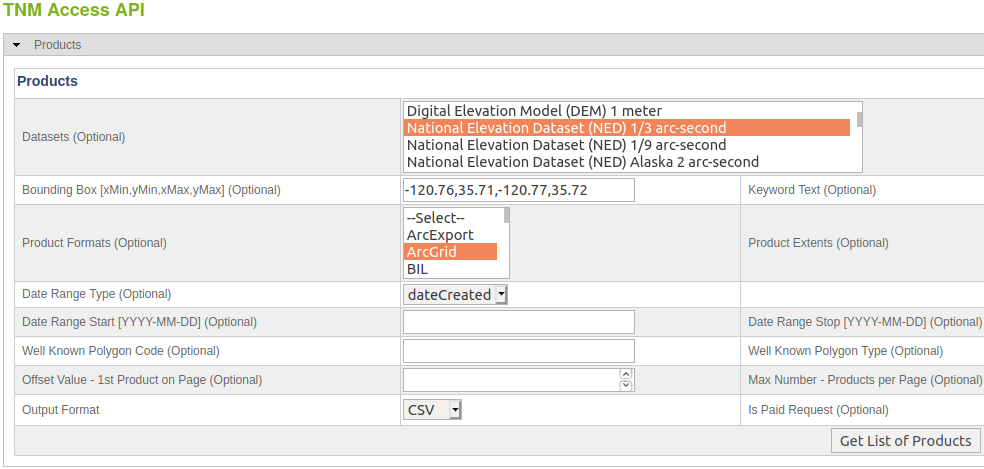
The USGS TNM Access API can be used to find the downloadURLs for GIS data. For the McMillan Airfield at Camp Roberts that is located at N35.718364, W120.768526, the following filter inputs were used to find the downloadURLs for the aerial imagery and elevation data.
An alternative way to download terrain and imagery data is through the visual TMS downloader. This will allow you to see the boundaries of each product on a map so that you know you are getting the correct data for the location you want.
For Camp Roberts, the downloadURL for the aerial imagery is https://prd-tnm.s3.amazonaws.com/StagedProducts/NAIP/ca_2016/35120/m_3512018_ne_10_h_20160530_20161004.jp2. This file should be downloaded to the ./Imagery/Original folder. The downloadURL for the elevation data is https://prd-tnm.s3.amazonaws.com/StagedProducts/Elevation/13/ArcGrid/USGS_NED_13_n36w121_ArcGrid.zip. The contents of this folder should be extracted to the ./Elevation/Original folder.
Step 3: Create a QGIS Project
The original data will require quite a bit of manipulation. It is in different projections, in file formats other than our desired ones, and covers a much larger area than we need. We will use QGIS to create a project, load the data, manipulate it into the required projection and area, and then export it to the correct file format.
Open the QGIS Desktop application.
Start a new project. From the menu bar, select “Project > New”
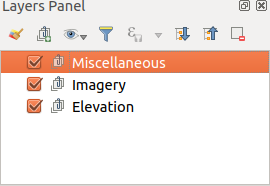
At the top of the Layers panel, press the “Add Group” button. A new item will appear in the Layers panel. Rename it to “Miscellaneous”. Repeat to create “Imagery” and “Elevation”. If you accidentally wind up with nested or out-of-order groups, you can rearrange them by drag-and-drop.
Next, we will set the project’s coordinate reference system (CRS). We want to work with a Cartesian (x/y/z) coordinate frame, so we will choose a projected coordinate system rather than a geodetic (latitude/longitude/elevation) coordinate system. Universal Transverse Mercator (UTM) is a popular projection with x, y, and z values measured in meters. If you know the latitude and longitude for the area at which you want to work, you can determine the corresponding UTM coordinate by using an online latitude/longitude-to-UTM calculator such as the one at https://geographiclib.sourceforge.io/cgi-bin/GeoConvert. For this tutorial, McMillan Airfield at Camp Roberts is located at N35.718364, W120.768526. Using the UTM calculator mentioned above, if I enter latitude=35.718364 and longitude=-120.768526, the calculator tells me that the equivalent UTM coordinate is zone 10N, x=701846.4901543224, y=3955007.0149711883. Therefore, we know we want to use WGS 84 UTM Zone 10N as our project CRS. On the menu bar, select “Project > Project Properties…” to bring up the Project Properties dialog. On the CRS tab, select the “Enable ‘on the fly’ CRS transformation” option. In the Filter field, type “UTM 10” to search for the “WGS 84 / UTM zone 10N” CRS. Select it from the list and press the OK button
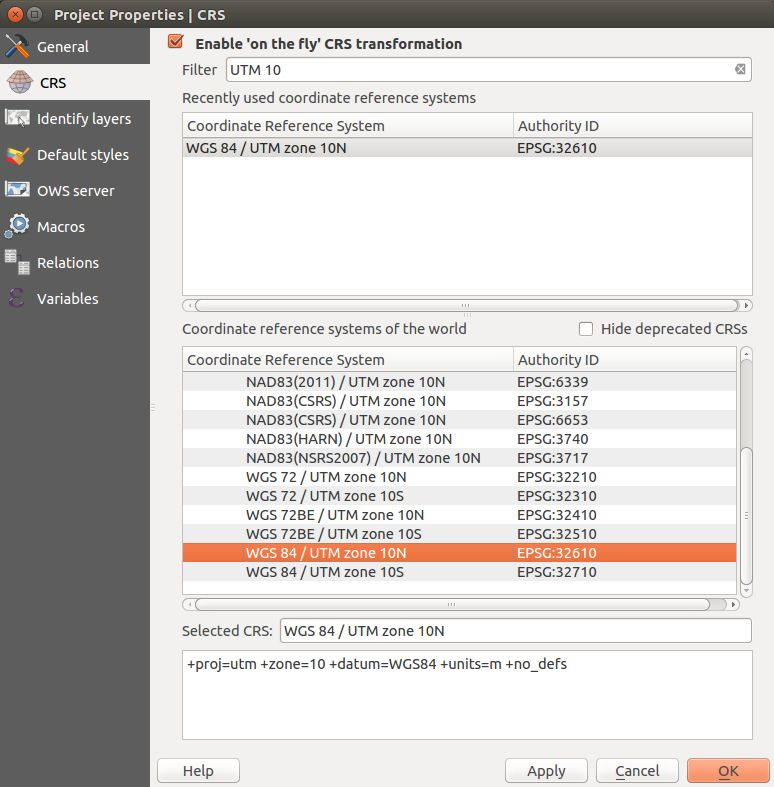
Finally, save the project by going to the menu bar and selecting “Project > Save As…”. In the resulting dialog, navigate to your root folder from Step 1, enter a file name (e.g. “mcmillan.qgs”), and press the Save button. Be sure to save periodically throughout this tutorial.
Step 4: Add a Basemap Layer
In this step, we will create a basemap layer. Note that this is not the actual imagery we will use as the texture for our terrain model. This will be used solely as an aid for locating and defining our area of interest.
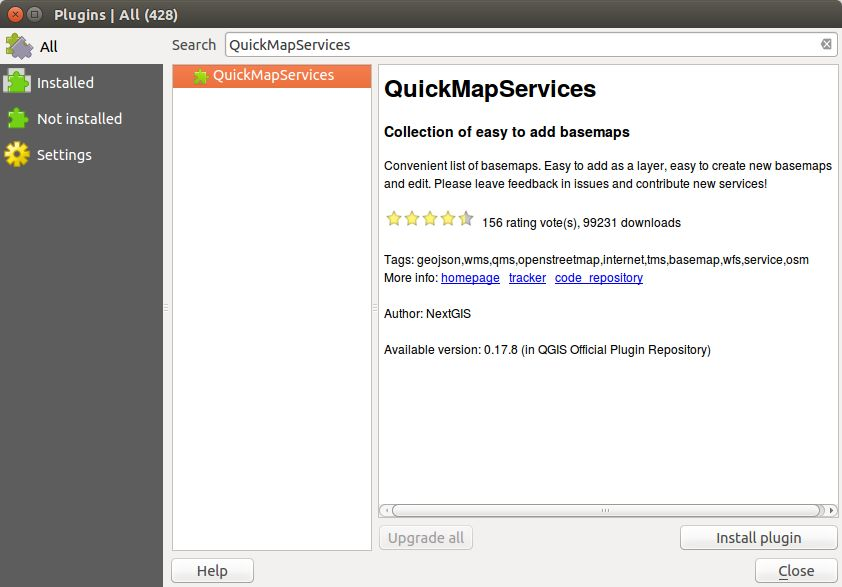
Install the QuickMapServices plugin. From the menu bar, select “Plugins > Manage and Install Plugins…” to bring up the Plugins dialog. In the Search box, type “QuickMapServices”. Select the plugin from the results list and press the “Install plugin” button. After the plugin has finished installing, press the “Close” button to dismiss the Plugins dialog.
From the menu bar, select “Web > QuickMapServices > Search QMS” to bring up the Search QMS panel. Using this panel, search for “Google” and double-click the result “Google Terrain Hybrid [TMS]”. This will create a new item in the Layers panel called “Google Hybrid”. If this layer is not already in the Miscellaneous group, drag-and-drop it there. Right-click on the layer, select “Rename”, and change the layer’s name to “Basemap: Google Hybrid”. Close the Search QMS panel, by clicking the X box in its top right corner.
Step 5: Create a Clipping Polygon
Navigate to the area in which you’ll be working. You can use the panning tool (from the menu, select “View > Pan Map”) to move around the map and the Zoom tools (from the menu, select “View > Zoom In” or “View > Zoom Out”) to change the scale of the basemap. While panning, you can also use your mouse’s scroll wheel to zoom in and out without having to explicitly switch to the Zoom tools. For the Camp Roberts area, we will navigate to McMillan Airfield at coordinate (701900, 3955000) at a scale of approximately 1:40,000. The current scale and the coordinate beneath the mouse cursor can be seen in the status bar at the bottom of the QGIS Desktop window.
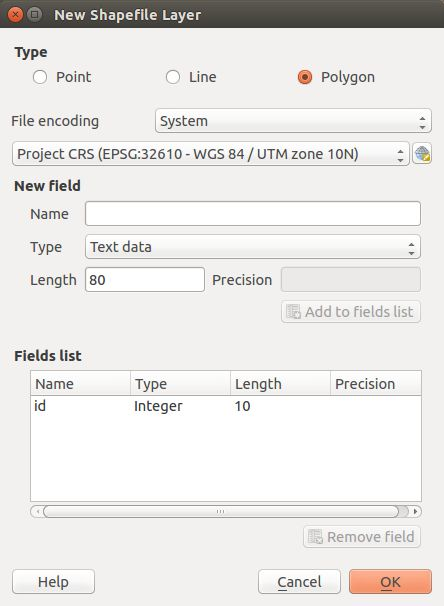
Create a new vector layer to hold the clipping rectangle. In the Layers panel, select the “Miscellaneous” group. From the menu bar, select “Layer > Create Layer > New Shapefile Layer”. In the New Shapefile Layer dialog, set Type to “Polygon”. Select “Project CRS” as shown below. Press “OK” to create the layer. Immediately after dismissing the New Shapefile Layer dialog, QGIS will prompt you to save the layer’s shapefile. In the Save Layer As dialog, navigate to “./Miscellaneous/ClippingRect” and save the shapefile as an ESRI Shapefile named “ClippingRect”.
Right-click on the “ClippingRect” layer in the Layers Panel and select “Select Layer CRS”. Confirm that the CRS Selector dialog is using the Project’s CRS, which for the mcmillan QGIS project is “WGS 84 / UTM zone 10N”.
Next we will draw the rectangle. In the Layer panel, make sure the ClippingRect layer is selected. From the menu bar, select “Layer > Toggle Editing” to make the layer editable. From the menu bar, select “Edit > Add Rectangle > Add Rectangle from Center and a Point” to select the polygon drawing tool. Click the center of the bounding rectangle you wish to define and then a corner. Finish the definition by right-clicking anywhere on the map.
Next, we will make the rectangle semi-transparent so that we can see the imagery behind it. In the Layers Panel, right-click on the ClippingRect layer and select “Properties”. In the Layer Properties dialog, select the Style tab. Under Layer Rendering, change transparency/opacity to 50% and then press OK.
We are finished with the ClippingRect layer. In the Layer panel, make sure the ClippingRect layer is selected. From the menu bar, select “Layer > Toggle Editing” to stop editing the layer. QGIS will ask you if you want to save the changes to the layer; select “Save”.
Step 6: Process and Export the Aerial imagery
Next, we will manipulate the aerial imagery. Our goal for this section is to create an image that is the size of the clipping rectangle and that is projected into the Project CRS.
First, hide the Basemap layer by unchecking the checkbox next to it in the Layers panel.
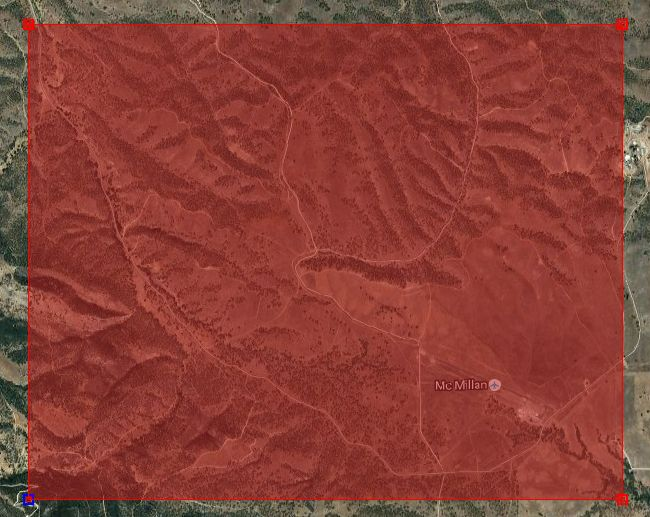
Select the “Imagery” layer group in the Layers panel. From the menu bar, select “Layer > Add Layer > Add Raster Layer…” Select the all jp2 files in the “./Imagery/Original” folder, and press Open. If the expected aerial image doesn’t show up behind the clipping rectangle as shown below, set the new layer’s CRS to the appropriate value. (This value will most likely be found in the CRS list as “Generated CRS” with a Authority ID of “USER:100000”.) See step 7 in the previous section for a reminder of how to do this.
If multiple files were added to span the area of the clipping rectangle, then the files must be merged before any reprojection or clip extraction. For Camp Roberts, a merge was not necessary. However, the steps for a merge are provided below.
From the menu bar, select “Raster > Miscellaneous > Merge…”
In the Merge dialog, select “Choose input directory instead of files” and use the “Select” button next to the “Output file” field to save the new image as a GeoTIFF with the desired name and location. If you want to add the newly created image to your project automatically, select “Load into canvas when finished”. Press the “OK” button to begin the process. The process could take a while depending on the size of the source images. Also, because you’re merging multiple images into one image, the resulting image could be quite large. Once the process has completed, press the “Close” button to dismiss the dialog.
Next, we will reproject the imagery to the Project CRS. From the menu bar, select “Raster > Projections > Warp (Reproject)…” to bring up the Warp dialog. Using the Input File drop-down list, select the original imagery layer. Press the “Select…” button next to the Output File field, navigate to “./Imagery/Reprojected” and save the new image in it as a GeoTIFF file called “ImageryReprojected.tif”. Enable the Source SRS field and select “Generated CRS/USER:100000”. Enable the Target SRS field and set it to the Project CRS, which in this case is EPSG:32610 (i.e. the ID for WGS 84 UTM Zone 10N). Set the resampling method to “Bilinear”. Press the OK button to begin the operation. Depending on your machine and the size of the imagery, this process might take a few minutes. After the process is complete, you might see a warning dialog saying something like “Warning 1: Empty SOT marker detected: Psot=12”; if so, you can ignore it. Finally, press “Close” to dismiss the “Warp (Reproject)” dialog. With the original imagery layer hidden, the new “Reprojected” layer should appear as shown below.
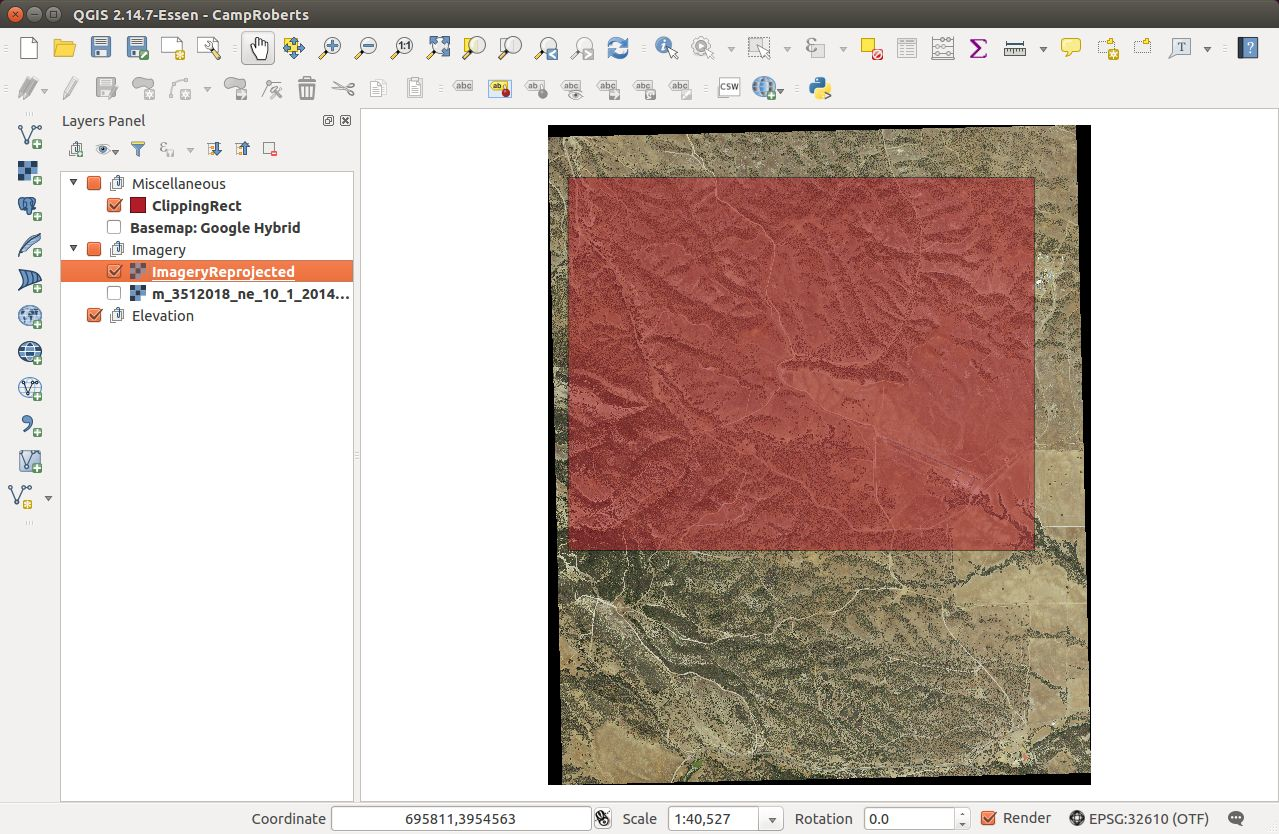
If the new “Reprojected” layer looks washed out instead, right-click it in the Layer panel, select “Properties”, and go to the “Transparency” tab. Under “Custom transparency options”, set “Transparency band” to “None
Next, we will clip the reprojected image to the area of interest. From the menu bar, select “Raster > Extraction > Clipper…” Make sure “Input file (raster)” is set to “ImageryReprojected”. Use the “Select…” button next to the “Output file” field to navigate to “./Imagery/Clipped” and save the output there as a GeoTIFF file named “ImageryClipped.tif”. Under “Clipping mode”, select “Mask layer”, set the “Mask layer” selection to “ClippingRect”, and check “Crop the extent of the target dataset to the extent of the cutline”. Press “OK” to start the process. If this does not work for you, instead click Raster > Extraction > Clip Raster by Extent. In the dialog, click the square button next to “Clipping extent field”, select “Calculate from Layer”, and then the clipping layer. When done with the clipping, press “Close” to dismiss the Clipper dialog and then hide the “ImageryReprojected” and “ClippingRect” layers to see the results. Once again, if the new image looks washed out, set its transparency to None as mentioned in the previous step.
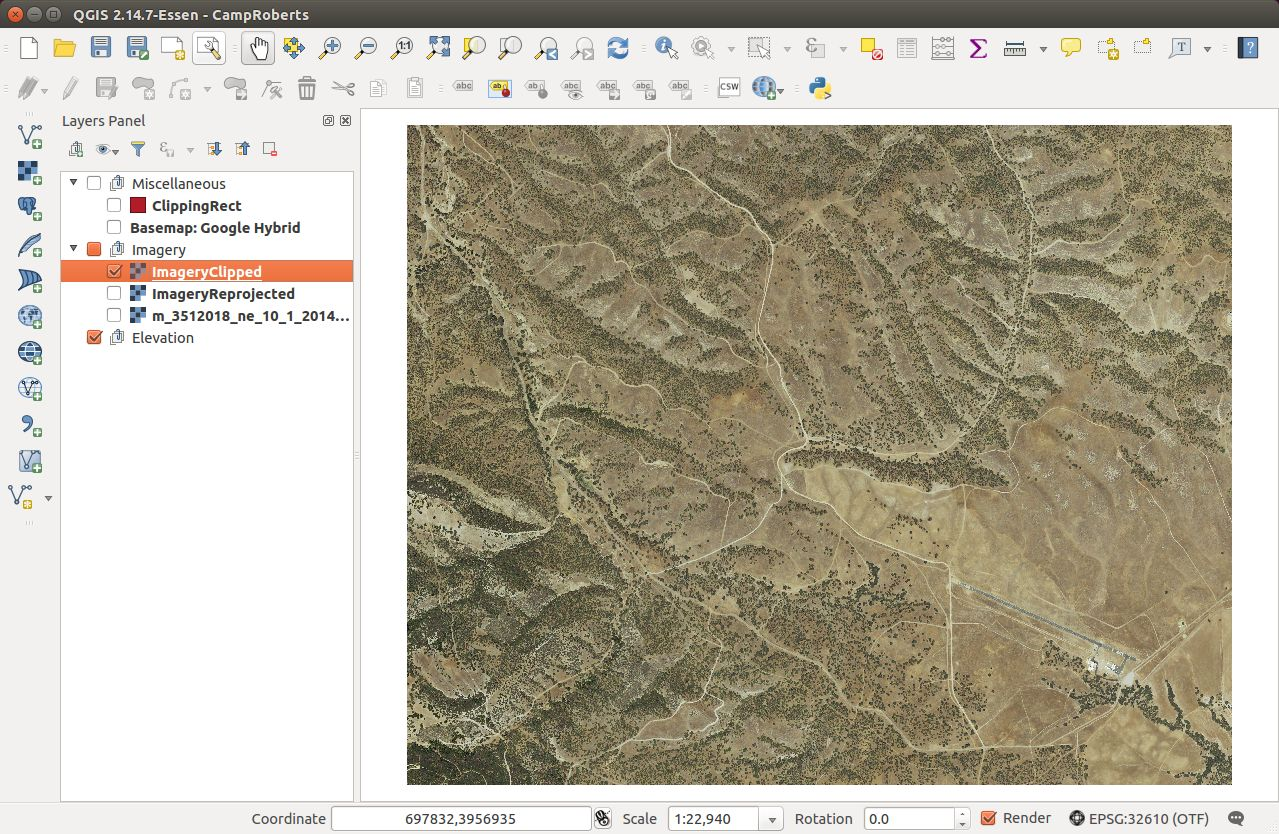
Finally, we will export the imagery. Our imagery is currently in a GeoTIFF format, but we need a JPEG image for the SCRIMMAGE simulator. From the menu bar, select “Raster > Conversion > Translate (Convert Format)…” On the Translate dialog, set “Input Layer” to “ImageryClipped”. For the output file, press the “Select…” button, navigate to “./Output”, and save the output image as a JPEG/JFIF file called “imagery.jpg”. Unselect “Load into canvas when finished”. I also recommend opening “Advanced Parameters” and manually adding “-b 1 -b 2 -b 3” to the “Additional command-line parameters” field. This exports only the first three (red, green, and blue) bands and omits any others, such as transparency or infrared bands. Press “OK” to begin the operation. After completion, press “Close” to dismiss the dialog. The resulting JPEG image is suitable for use with SCRIMMAGE.

Step 7: Process and Export the Elevation Data
The elevation preparation process will follow the same basic steps as the process for the aerial imagery.
Select the “Elevation” layer group in the Layers panel. From the menu bar, select “Layer > Add Layer > Add Raster Layer…” Select the elevation data file,”./Elevation/Original/grdn36w121_13/w001001.adf”, and press Open. If the elevation data doesn’t show up behind the clipping rectangle as shown below, set the new layer’s CRS to the appropriate value (in this case, “EPSG:4269, NAD83”).
Next, we will reproject the elevation data to the project CRS. From the menu bar, select “Raster > Projections > Warp (Reproject)…” to bring up the Warp dialog. Using the Input File dropdown list, select the original elevation layer. Press the “Select…” button next to the Output File field, navigate to “./Elevation/Reprojected” and save the new elevation data in it as a GeoTIFF file named “ElevationReprojected.tif”. Enable the Target SRS field and set it to the project’s CRS. Set the resampling method to “Bilinear”. Press the OK button to begin the operation. Again, this could take a few minutes. When the operation is complete, press “Close” to dismiss the Warp dialog and hide the original elevation layer to see the results. (You might not notice anything unless you zoom out quite a bit.)
Next, we will clip the reprojected elevation data to the area of interest. From the menu bar, select “Raster > Extraction > Clipper…” Make sure “Input file (raster)” is set to “ElevationReprojected”. Use the “Select…” button next to the “Output file” field to save the output file as a GeoTIFF file named “ElevationClipped.tif” in “./Elevation/Clipped”. Under “Clipping mode”, select “Mask layer”, set the “Mask layer” to “ClippingRect”, and check “Crop the extent of the target dataset to the extent of the cutline”. Press “OK” to start the process. Again, if this does not work for you, click Raster > Extraction > Clip Raster by Extent. In the dialog, click the square button next to “Clipping extent field”, select “Calculate from Layer”, and then the clipping layer. When done, press “Close” to dismiss the Clipper dialog and then hide the other layers to see the results.
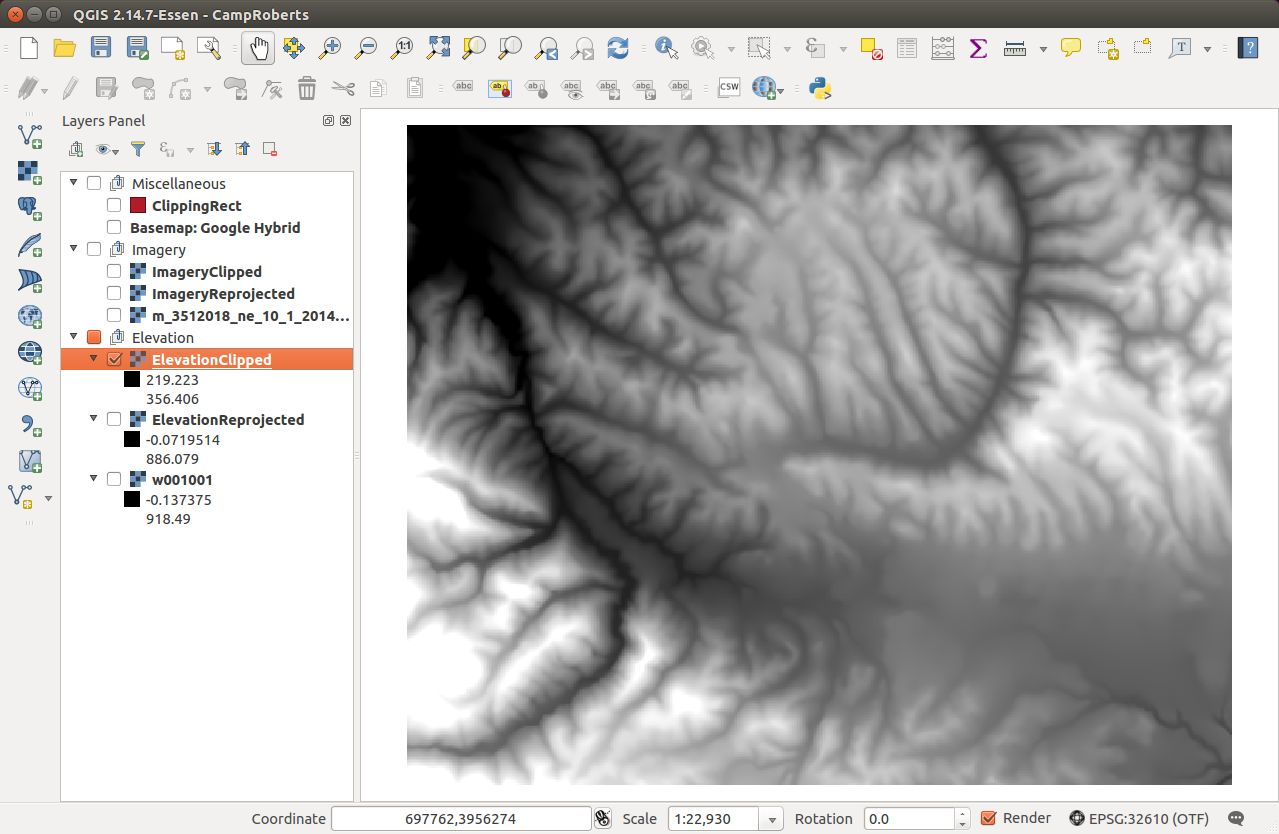
Finally, we will export the elevation data from its current GeoTIFF format to the VTK format expected by SCRIMMAGE. This step is a bit more involved because QGIS doesn’t support VTK natively. We will install and use the GRASS package within QGIS.
Start the GRASS graphical user interface.
To set the GRASS GIS database directory, press the Browse button, navigate to parent folder for ./Ouptut, create a new folder called “grassdata”, then select it and press “Open”.
Create a new GRASS Location. Set “Project Location” to “mcmillan” and “Location Title” to “mcmillan”. Press “Next”.
Choose the method for creating a new location: pick “Select EPSG code of spatial reference system” and press “Next”.
To choose an EPSG code, type ID that was used in QGIS. For example, for Camp Roberts, enter the ID “32610” into the “EPSG code” field. This corresponds to the WGS84 UTM zone 10N reference system that we’ve been using throughout the tutorial. Press “Next”.

Next, GRASS will ask you to select from a list of datum transformations. Select “0 - Do not apply any datum transformations”. Press “OK”. GRASS will show you a summary of your new GRASS Location. Press “Finish”.
GRASS will ask you if you want to set the default region extents and resolution now. Select “Yes”. For Camp Roberts, set the following values:

Create a new mapset called “Elevation”. Select it and then press “Start GRASS session”. The Layer Manager and Map Display windows will appear.
We need to import the clipped elevation GeoTIFF created in QGIS. From the Layer Manager menu bar, select “File > Import raster data > Common formats import [r.in.gdal]”. Set “Source type” to “File” and then under “Source settings”, press the “Browse” button to navigate to “./Elevation/Clipped” and open “ElevationClipped.tif”. Back in the Import dialog, make sure “Add imported layers into layer tree” is selected and press “Import”. The elevation raster should now be visible on the Map Display window. Press “Close” to dismiss the Import dialog. The elevation raster should now be visible on the Map Display window. Press “Close” to dismiss the Import dialog.

Before exporting, we must be sure that the red computational boundary box surrounds the image. To do this, click Settings > Computational Region > Set region. From there, select your map under “Set region to match raster maps” and click Run.
From the Layer Manager menu bar, select “File > Export raster map > VTK export [r.out.vtk]”. On the export dialog, select the “Optional” tab. Set:
Raster map(s) to be converted to VTK-ASCII: ElevationClipped@Elevation - Name for VTK-ASCII output file: use the browse button to navigate to “./Output” and save the file as “elevation.vtk”
Name of input elevation raster map: ElevationClipped@Elevation
Press the “Run” button. After which, you are done creating your final elevation file. You can now close GRASS.
It is a good idea to be sure that the elevation file looks correct after exporting to .vtk. To visualize it, download a VTK viewer such as Paraview and make sure the elevation file looks correct in 3D.
Step 8 (Optional): Create Building Data
SCRIMMAGE will display ground-based polygon extrusions if the installed VTK library version is greater than or equal to 7. It obtains the location and height for these extrusions from a GeoJSON file. Thia GeoJSON file can be obtained from a data source or created with QGIS. If it is obtained from a data source, it will likely need to be processed with “Vector > Geoprocessing Tools > Clip”. The following steps show how to create the GeoJSON file with QGIS.
Enable the ClippedImagery layer and select “View > Zoom to Layer”.
Add a layer group between “Miscellaneous” and “Imagery”. Rename it to “Building”.
Using Step 5.2 as a reference, add a new polygon shapefile layer to the “Building” group. When creating this shapefile, add a new field with the name “Height” and use “Project CRS”. Save this file to a ./Building folder and name it “Building”.
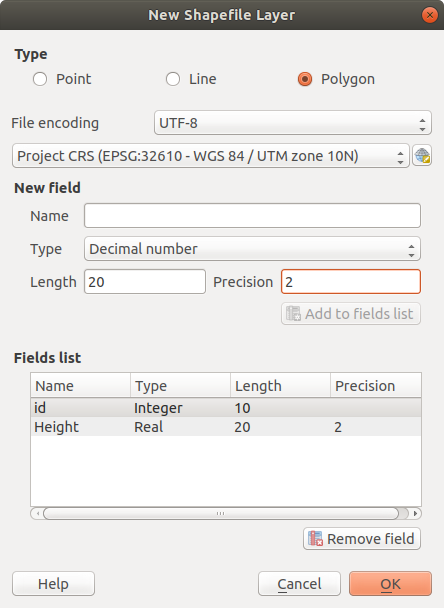
Using Step 5.4 as a reference, add polygons to the shapefile. After creating each polygon, a prompt will ask for the “ID” and “Height” values. The “ID” value can be any arbitrary value. However, the “Height” value should be the building’s height in meters.
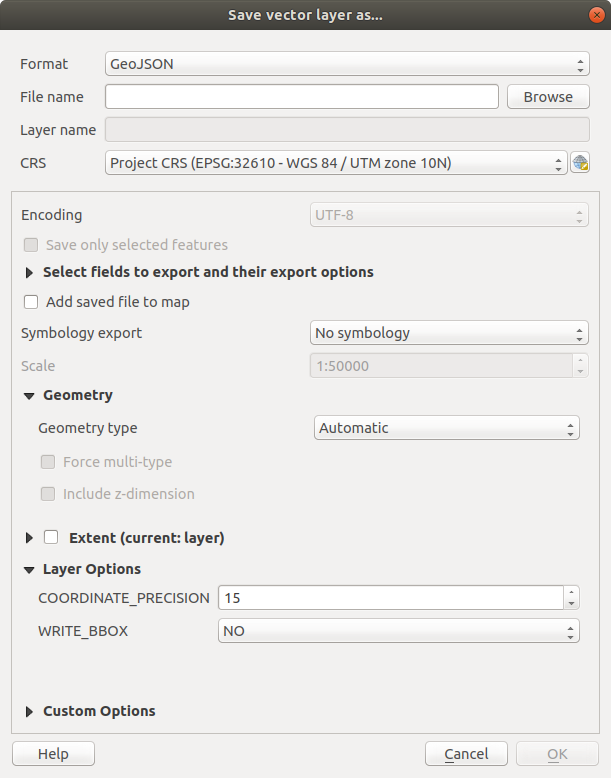
Export the shapefile to a GeoJSON file. Select the Building shapefile in the layer’s pane. Select “Layer > Save As” in the top menu bar. Set the format to “GeoJSON”. Set the output file name such that its path is the ./output folder. Set the CRS to “Project CRS”. Disable “Add saved file to map”.
Step 9: Use the Digital Terrain Model in SCRIMMMAGE
SCRIMMAGE uses the digital terrain model, specified in its mission file. To be more precise, the mission file’s attribute value for “terrain” is used to select the digial terrain model that the simulation will use. SCRIMMAGE searches within the paths defined by the ${SCRIMMAGE_DATA_PATH} environment variable for a xml file with a relative path “/gui/terrain/<terrain_name>/<terrain_name>.xml”, where <terrain_name> matches the attribute value for “terrain”. SCRIMMAGE uses this xml to set the aerial imagery, elevation data, extrusion data, and CRS for the simulation. Please mimic the mcmillan terrain that is packaged with SCRIMMAGE to make your newly created terrain model accessible to SCRIMMAGE. After which, configure your mission file to load this terrain model and set the latitude and longitude parameters for the mission to be within the bounds of your terrain data.